Turn the Rock Band 3 keyboard into a sampling instrument with the WAV Trigger
The Rock Band 3 keyboard happens to also be a nice battery powered MIDI keyboard controller that you can pick up on eBay for 20 bucks or so. With a WAV Trigger and a little electronic glue, which I'll explain in this article, you can make a self-contained, velocity-sensitive, multi-bank sample playback instrument. The Rock Band 3 keyboard buttons and left hand controller allow you to re-map the keys, change sound banks and adjust note release time (sustain) on the fly. I'll be using classic Mellotron sounds here, but you can easily create your own sample banks using a VSTi software synth.
For those of you just tuning in, the WAV Trigger is a high-fidelity polyphonic audio player. It has 14 "voices" to play and mix uncompressed, stereo, 44.1kHz wav files directly from a microSD card. Audio can be triggered either from digital inputs or serial commands, and latency averages around 8ms (12ms max). The serial control port also supports MIDI protocol, and in MIDI mode it's velocity sensitive (MIDI velocity maps to volume) and supports adjustable release times (sustain). The mixing engine includes a voice-stealing algorithm so that new MIDI notes take precedent if all 14 voices are being used, and the oldest playing voice is "stolen" to play the new note.

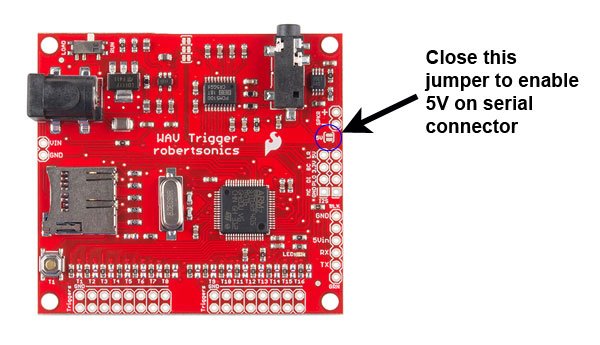
Step 1: Prep your WAV Trigger. We'll need to provide 5V to our MIDI input interface circuit, and the easiest way to do this is to close the solder jumper on the WAV Trigger that connects the on-board 5V to the serial connector. The WAV Trigger doesn't ship from SparkFun this way, because people might connect an FTDI Basic at the same time that they're powering the WAV Trigger from the barrel connector. I always close this jumper because it allows me to power the WAV Trigger from the FTDI basic.
I also strongly advise that you install post headers or receptacles in any WAV Trigger connector that you're planning to use. PCB connector pads are not meant for direct soldering and I've seen too many pads ripped off boards because people solder directly to them and don't provide strain relief.
While you're at it, update your firmware from the download page. The latest firmware v1.04 contains new MIDI features that are used by the Rock Band 3 keyboard.
Step 2: Build the MIDI Input interface circuit. The RB3 keyboard has a standard 5-pin circular DIN MIDI Out port on its right side. We need to convert the output's 20mA current loop to a logic level signal that can feed the WAV Trigger's RX pin, and this is done with an opto-isolator. Here's the circuit:
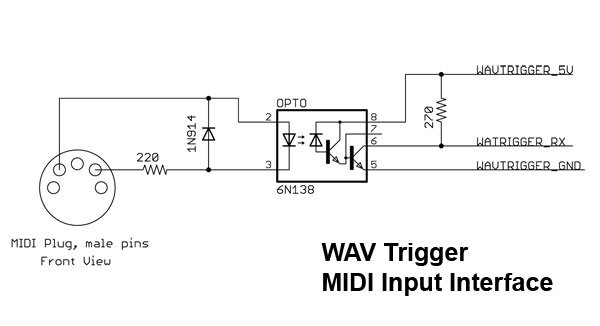
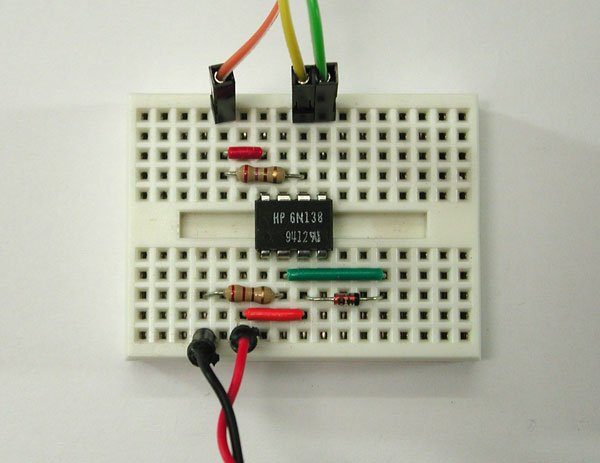
As you can see, it's pretty simple - just a single 8-pin IC, one diode and two resistors - and is easy to build on a small breadboard. I used an 6N138 optoisolator, but the PC-900 works equally well. The diode is a 1N914, but any small signal diode should work. I also sacrificed a MIDI cable and soldered posts on the two wires we'll be using to make it easy to insert into the breadboard. Here's the completed MIDI In circuit:
Step 3: Connect the MIDI Input circuit to the WAV Trigger. There are only 3 connections required: 5V, GND and the logic level TX output of the Opto to the WAV Trigger RX. Here are the connections:
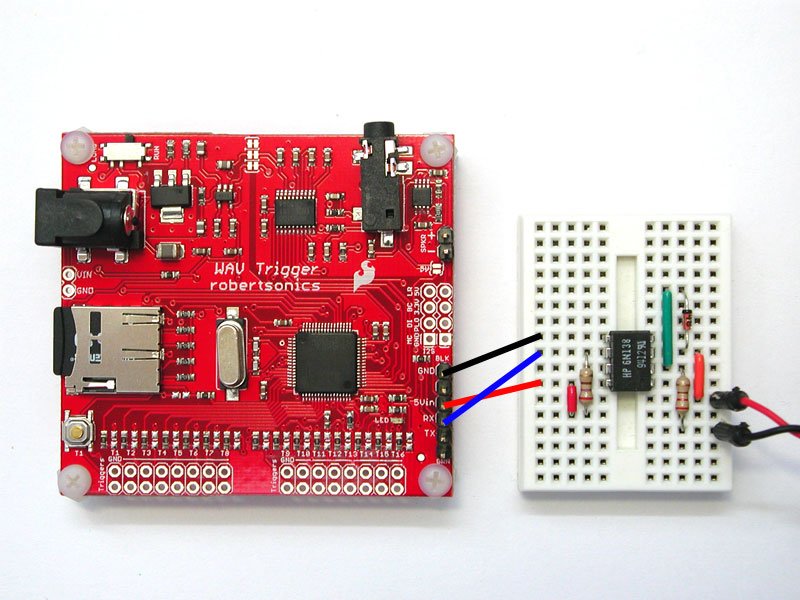
And here's the completed assembly:
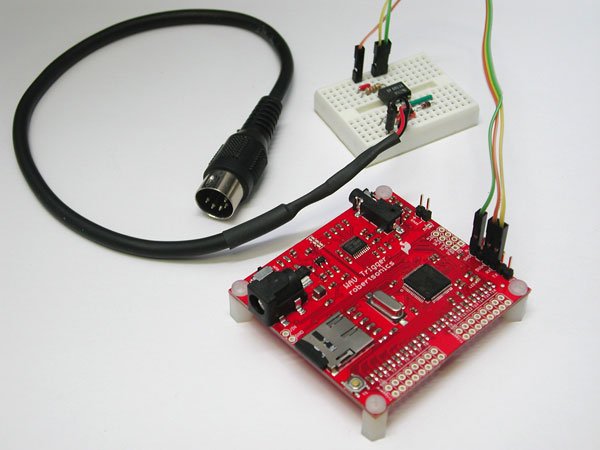
MIDI_IN_Assy001
Step 4: Prepare the WAV Trigger's microSD card. In MIDI mode, the WAV Trigger maps incoming MIDI note numbers to track numbers using an internal MIDI bank number. In the default bank 1, MIDI note number 48 maps to track "048xxx.wav" and so on. Each MIDI bank adds 100 to the track number, so that in bank 2 MIDI note number 48 maps to track "148xxx.wav", in bank 3 MIDI note number 48 maps to track "248xxx.wav" and so on. In this way, you can have up to 10 complete sets of sample tracks for the MIDI key range of notes 0 - 99.You can change banks in any one of 3 ways:
Change the MIDI Channel that your MIDI Controller is transmitting on. The MIDI Channel number (starting at 0) is added to the bank number.
Install buttons on two of the WAV Trigger's trigger inputs and use the MIDI BankUp and MIDI BankDn trigger functions.
Send MIDI Program Change messages from your MIDI Controller.
We'll use the last method here because the Rock Band 3 keyboard supports this feature using its front panel buttons. How convenient.To get you started, here are the track files for 5 complete sets of classic Mellotron sounds, sampled from an actual Mellotron, courtesy of Leisureland, USA. The track filenames have already been assigned to map the sounds to the correct MIDI Notes in banks 1 through 5.
Copy all files to your microSD card root directory. Run the InitMaker application, enable MIDI on the serial port and save the init file to the microSD card. Install the microSD card into the WAV Trigger.
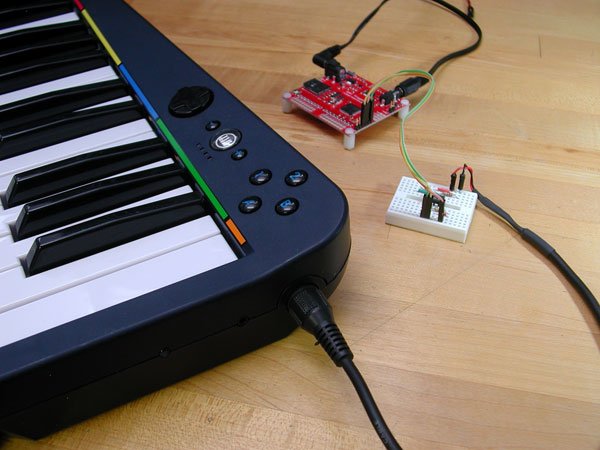
Step 5: Connect everything up and play! Plug the MIDI cable into the Rock Band 3 keyboard, connect your amp or powered speakers to the WAV Trigger's audio out (or use the on-board mono amp with an 8-Ohm speaker), supply power to the WAV Trigger and turn on the Rock Band 3 keyboard. If all is well, you should hear the violins in bank 1 when you play the keyboard.
Here's a quick summary of the functions available using the RB3 keyboard front panel controller buttons. First up, The 1 and B buttons shift the keyboard up and down an octave at a time, allowing access to more notes than the physical 25 keys on the controller. This function is internal to the RB3 keyboard and simply shifts the note numbers that the keyboard sends up or down 12 note numbers (one octave.)

Next, the 2 and A buttons increment and decrement the WAV Trigger's MIDI Bank number, thereby changing the sound banks. This works because these buttons send MIDI Program Change messages.
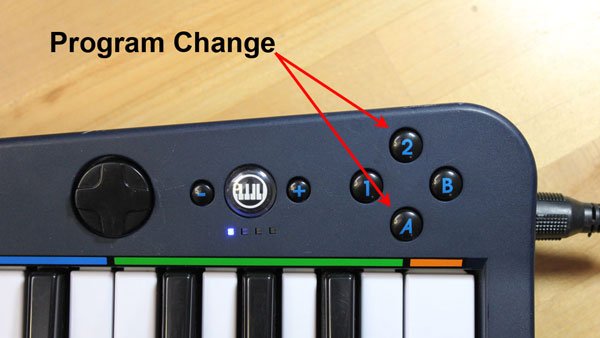
The - button is a panic button, and tells the WAV Trigger to immediately stop all sounds. This is the same as MIDI All-Notes-Off. Technically, this button sends the MIDI RealTime Stop command (0xFC) and I've added code to the WAV Trigger to stop all voices when this is received.

Finally, the continuous controller on the left "handle" of the RB3 keyboard adjusts the WAV Trigger's release time or sustain. This pad sends MIDI Mod Wheel Controller data which I've mapped to MIDI release time in the WAV Trigger.

That's it. Here's a short demo video of all this in action. (Please keep in mind that I'm a guitar player, not a keyboard player!) Please consider sharing if you create additional sound banks.