Arduino Serial Control Tutorial
I've had a number of requests recently for help with using the WAV Trigger Serial Control Library for Arduino, so here's a basic "how-to" using the example Uno sketch that's now included in the library. For those of you unfamiliar with GitHub, fear not; Just use the "Download Zip" button on the library's GitHub repo page (above link.)
Step 1: Install some Arduino libraries
At a minimum, you'll need to know how to install third party libraries into your Arduino development environment. There are plenty of tutorials available on that subject, so check 'em out and come back here when you're up to speed. The example sketch requires 3 libraries be installed into your Arduino "libraries" folder.
(Note: As of 2023, the Metro library is not longer part of the official Arduino set, but is included in the Teensyduino installation package.)
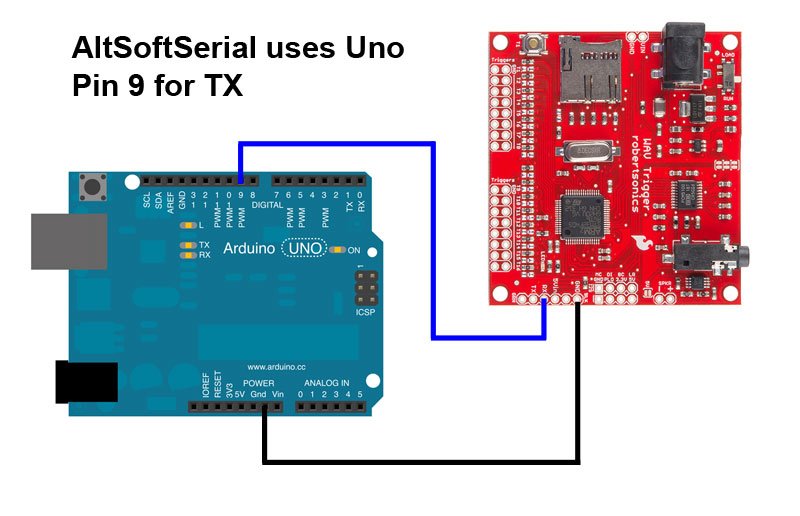
Some Arduinos, such as the Uno, only have a single hardware serial port. I find it cumbersome to have to share with the USB connection when you need a serial port for your sketch. The AltSoftSerial library effectively creates another serial port out of normal digital pins. The specific pins it uses for RX and TX vary with the Arduino board type, and you can find out which ones by looking in the "known_boards.h" file in that library. All we need to know for now is that for the Uno, it makes Pin 9 be the TX pin.
Update: If you'd rather use a hardware serial port (UART) instead, the library now also supports Serial, Serial1, Serial2 or Serial3. The caveat is that you have to make one small edit in the wavTrigger.h file. See the library readme file for the details of how to do this.
Metro is a great interval timer class when you need to schedule events that you can't use delay() for, such as blinking lights. The nice thing is that it doesn't use any hardware timer resources. I use it a lot, and you should too.
Step 2: Prep your WAV Trigger
I strongly advise that you install post headers or receptacles in any WAV Trigger connector that you're planning to use. PCB connector pads are not meant for direct soldering and I've seen too many pads ripped off boards because people solder directly to them and don't provide strain relief.
The example Arduino sketch is written to use a specific set of audio tracks. Download these tracks, unzip and copy them to the WAV Trigger's microSD card. They already have the correct track names. You do not need an init file for this example unless you're using the on-board amplifier and a speaker instead of the line out audio jack.
Step 3: Connect the WAV Trigger to the Uno
The library currently only implements commands to the WAV Trigger, so you only need to connect 2 wires: GND, and the Uno TX pin to the WAV Trigger RX pin.
Step 4: Power up and run the sketch
Apply power to both boards and connect your USB cable to the Uno. If the libraries have been installed properly, you should be able to open the WTriggerUno sketch: File->Sketchbook->libraries->WavTrigger->wTriggerUno.
This example sketch demonstrates many of the library's functions for starting, looping, fading, cross-fading, stopping tracks and groups of tracks and sample-rate (playback speed) control. It makes use of the sample tracks from Step 2 above, and probably won't make much sense if you try to use your own sounds as is. You can of course, modify the example sketch to work with any sounds you wish.
The example sketch also assumes you have recent firmware in your WAV Trigger. Some of the features demonstrated by the sketch, such as pitch bending, have been added since the last SparkFun release firmware, so in order to get the full effect, you may need to update your WAV Trigger with the latest version from the download page.
Extra Credit: Powering the WAV Trigger from the Uno
It's possible to power the WAV Trigger from the Arduino 5V, although you probably should not do this if you're planning to drive a speaker continuously at high-levels using the on-board amplifier, due to potentially high 5V current draw (even though I do.)
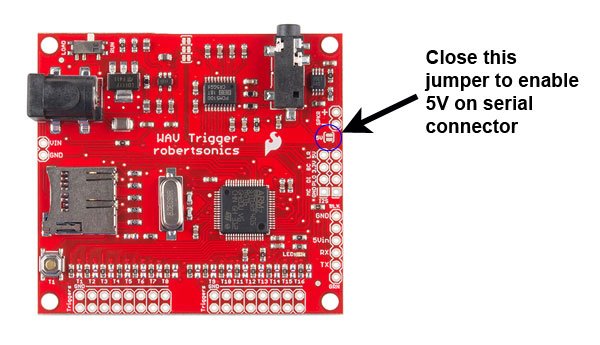
First you'll need close the solder jumper on the WAV Trigger that connects the on-board 5V to the serial connector. The WAV Trigger doesn't ship from SparkFun this way, because people might connect an FTDI Basic at the same time that they're powering the WAV Trigger from the barrel connector. I always close this jumper because it allows me to power the WAV Trigger from the FTDI basic.
Now just connect a 3rd wire from the Uno 5V pin to the WAV Trigger pin labeled "5Vin" next to the serial RX pin. Make sure not to power the WAV Trigger from the barrel connector at the same time!